¶ Office Orders
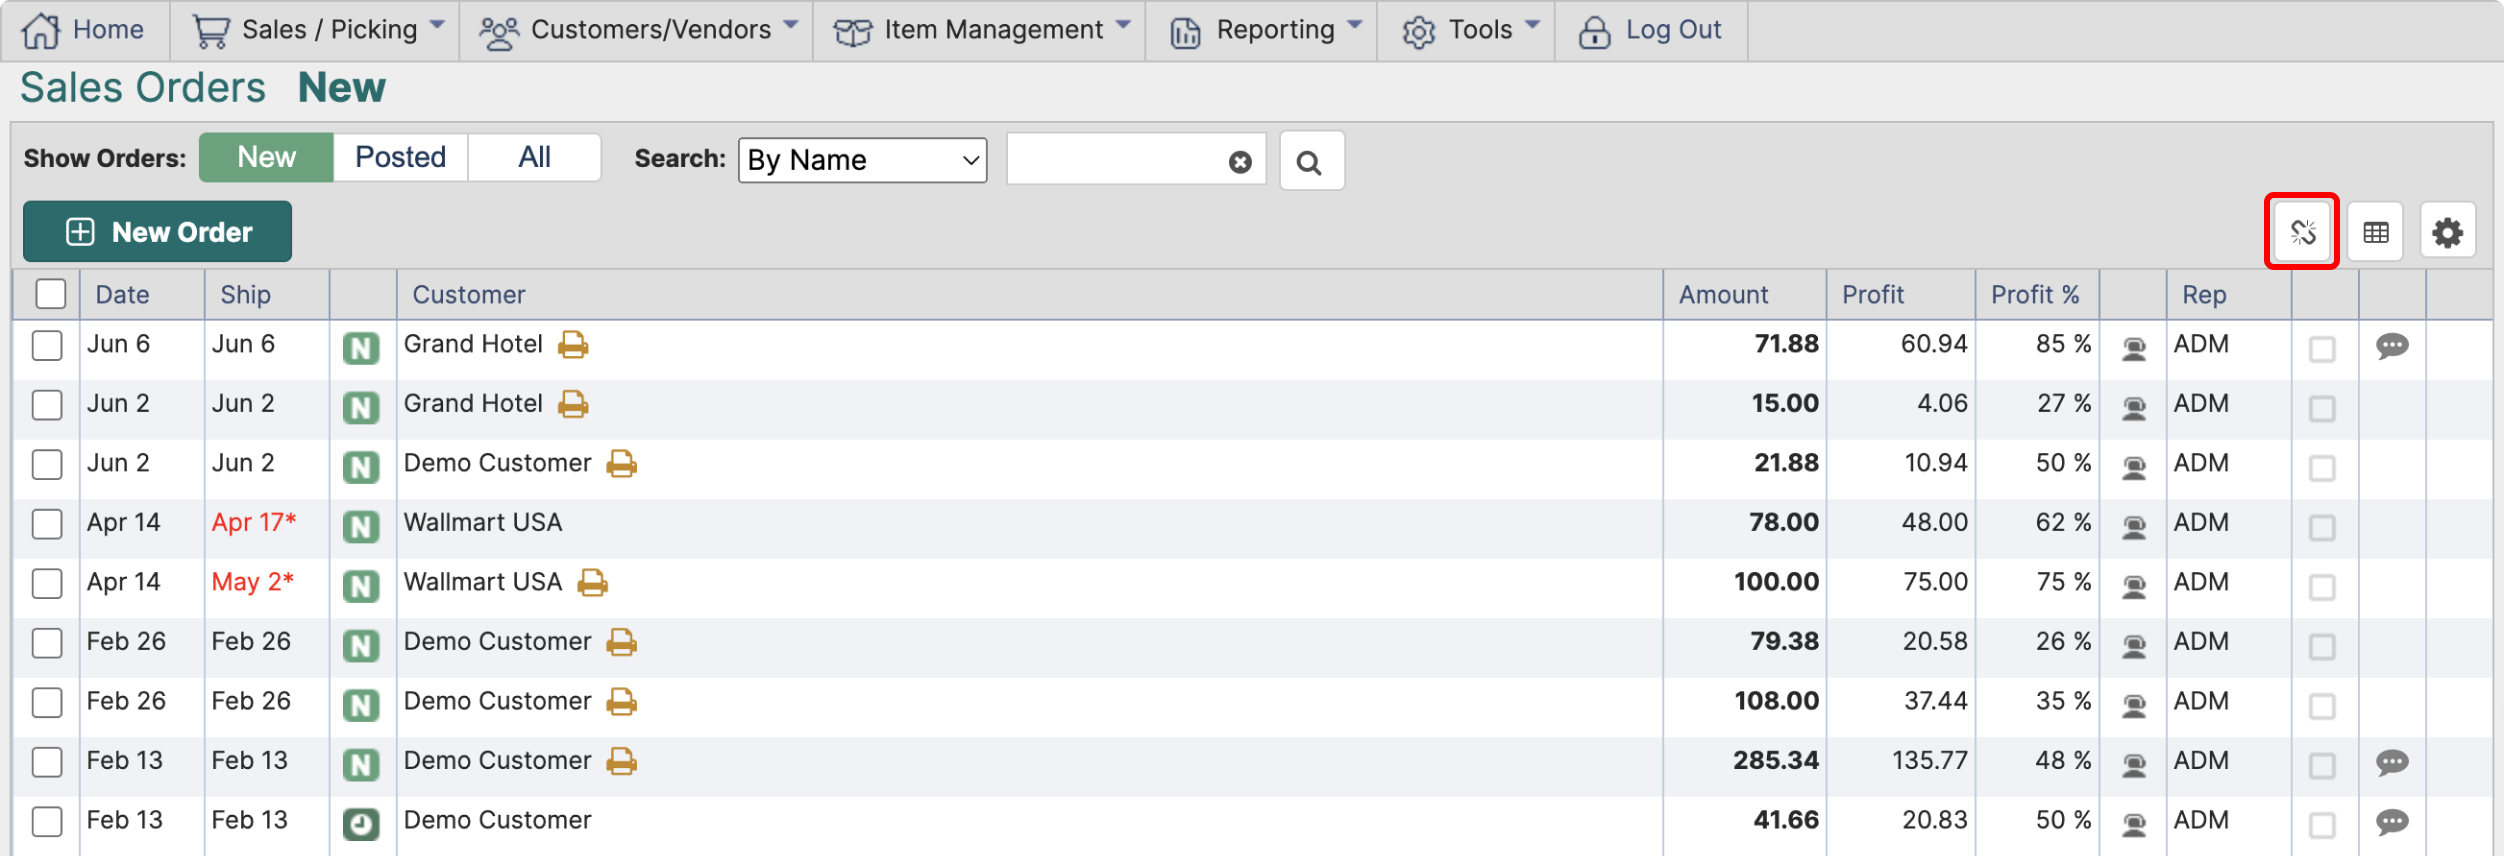
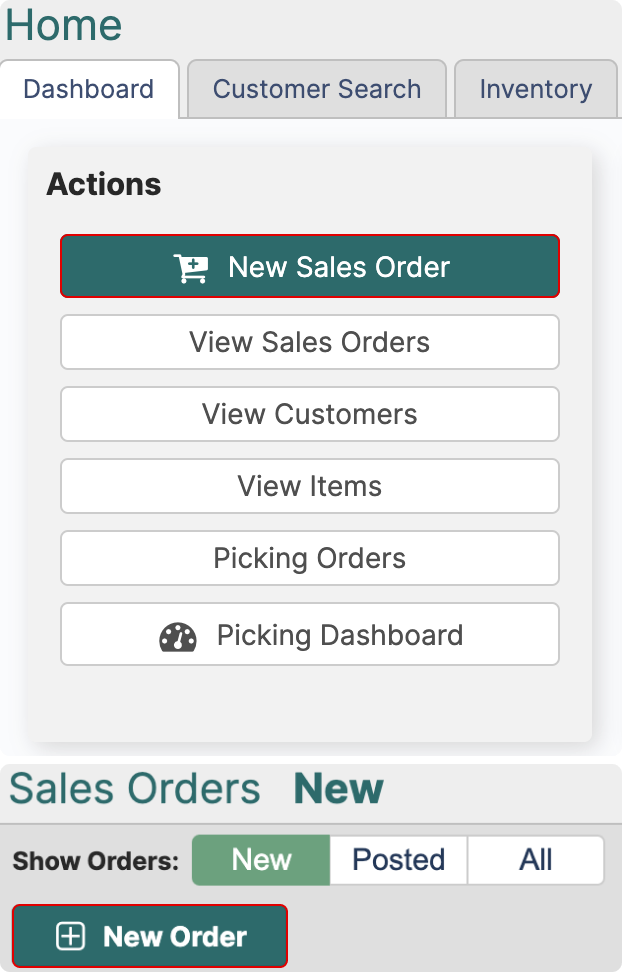
Office orders are ones that you create yourself. New office order can be started either from Home Page or from Sales Orders Page.
¶ Order Overview Page
Once you click New Order, you will be taken to Order Overview page. First thing you need to do is fill out the main order information.

¶ 1 Select a customer
If you click on the customer bar or on the customer icon, a search window will pop up. To easily find the needed customer, you can search by customer name, address, city or state.
¶ 2 Create a new customer
You can also create a customer from the order overview page.
To learn more about how to create new customers check out the /Customer_Management Page.
After creating a customer and completing the order, navigate to Customers Page and Approve the new customer that you created.
¶ 3 Select the Ship Type
Choose between Delivery, Mail or Self Pickup
You can add more shipping types by navigating to:
Tools→Settings→Tables→Shipping Types
¶ 4 Choose the Shipping Date
All orders will have two dates - Shipping Date and Created Date
¶ 5 PO number (optional)
If you want a Purchase Order number to appear on the invoice, you can write it in the PO number field
¶ 6 Order Manager (optional)
If you want to keep track of who created an order, you can fill out the Order Manager field
¶ 7 Comments (optional)
Your order comment will appear on the invoice
¶ Add/Edit Items
After you fill out the main order information, you can start adding items to the order.
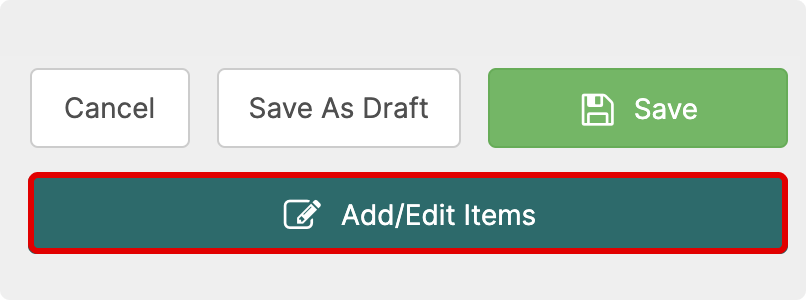
Click Add/Edit Items to navigate to the order page
¶ Navigation
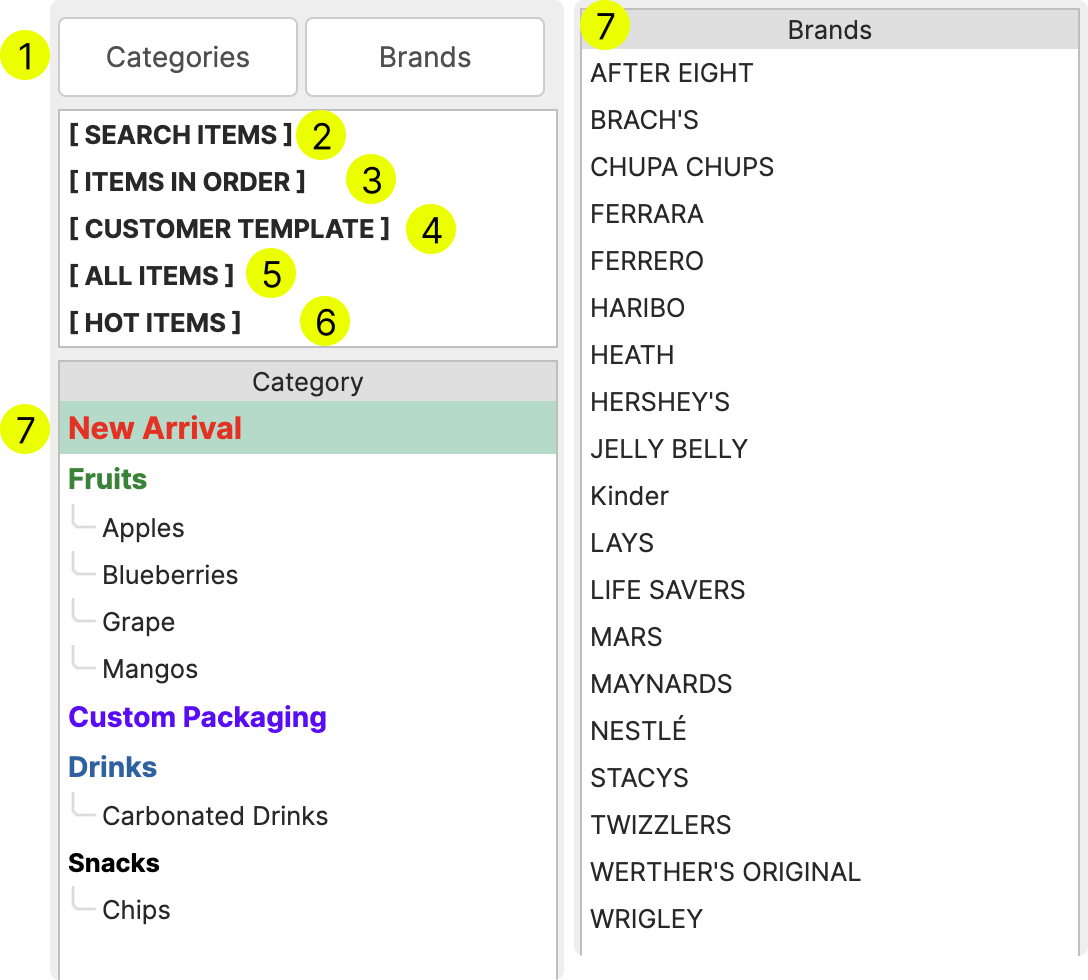
On the left-hand side of the screen you have tools that will help you quickly navigate and find the necessary items.
¶ 1 Categories/Brands
Categories are displayed as default (7), but you can also display Brands. If you click on one of the categories or brands, you will navigate to all items within that category/brand.
¶ 2 Search Items
Search items page allows you to quickly add items by searching the entire catalog using the Item Name or Item Description. The main feature of this page is that when you add an item, you can instantly write a new search prompt.
* To enable this feature click the gear icon in the top right corner of the page and check the box “Always Set Focus on Search”

¶ 3 Items in Order
This will display all items that have been selected within this order.
¶ 4 Customer Template
Customer template is a semi-automated page that helps you easily find items that are specific to a customer.
¶ Sales History
After a sales order with a new item for the customer has been posted, this item along with the sales price will appear in Customer Template.
Look back period: The items will remain in the Customer Template until manually removed or 365 days pass without a repeated sale of that item.
¶ Prices
For items with Custom Price enabled, last sales price will be saved within the Customer Template.
However, there can be exceptions depending on other Price mechanisms that you have in place, such as Price Levels.
¶ Manual Configuration
You can manually alter which items appear in the Customer Template.
To add an item to the template:
1. Go to all items and find the required item
2. If you have custom price enabled for the item and the price is not regulated by a Price Level → Enter the custom price by clicking on the green price field (1)
3. To add the item to the template, click the + icon (2)

To remove an item from the template:
1. Go to the Customer Template and find the item that you want to remove from the template
2. Click Remove Icon (3) to remove the item from the Customer's Template and reset the price

¶ Web Store “Order Again” Section
Customer Template is tied to the Order Again section in the customer's Web Store. Any changes made inside the customer template will immediately take place in Web Store as well.
¶ 5 All Items
Clicking All Items will return a list of all active items. In this section you can use Categories or Brands to quickly find the required item.
¶ 6 Hot Items
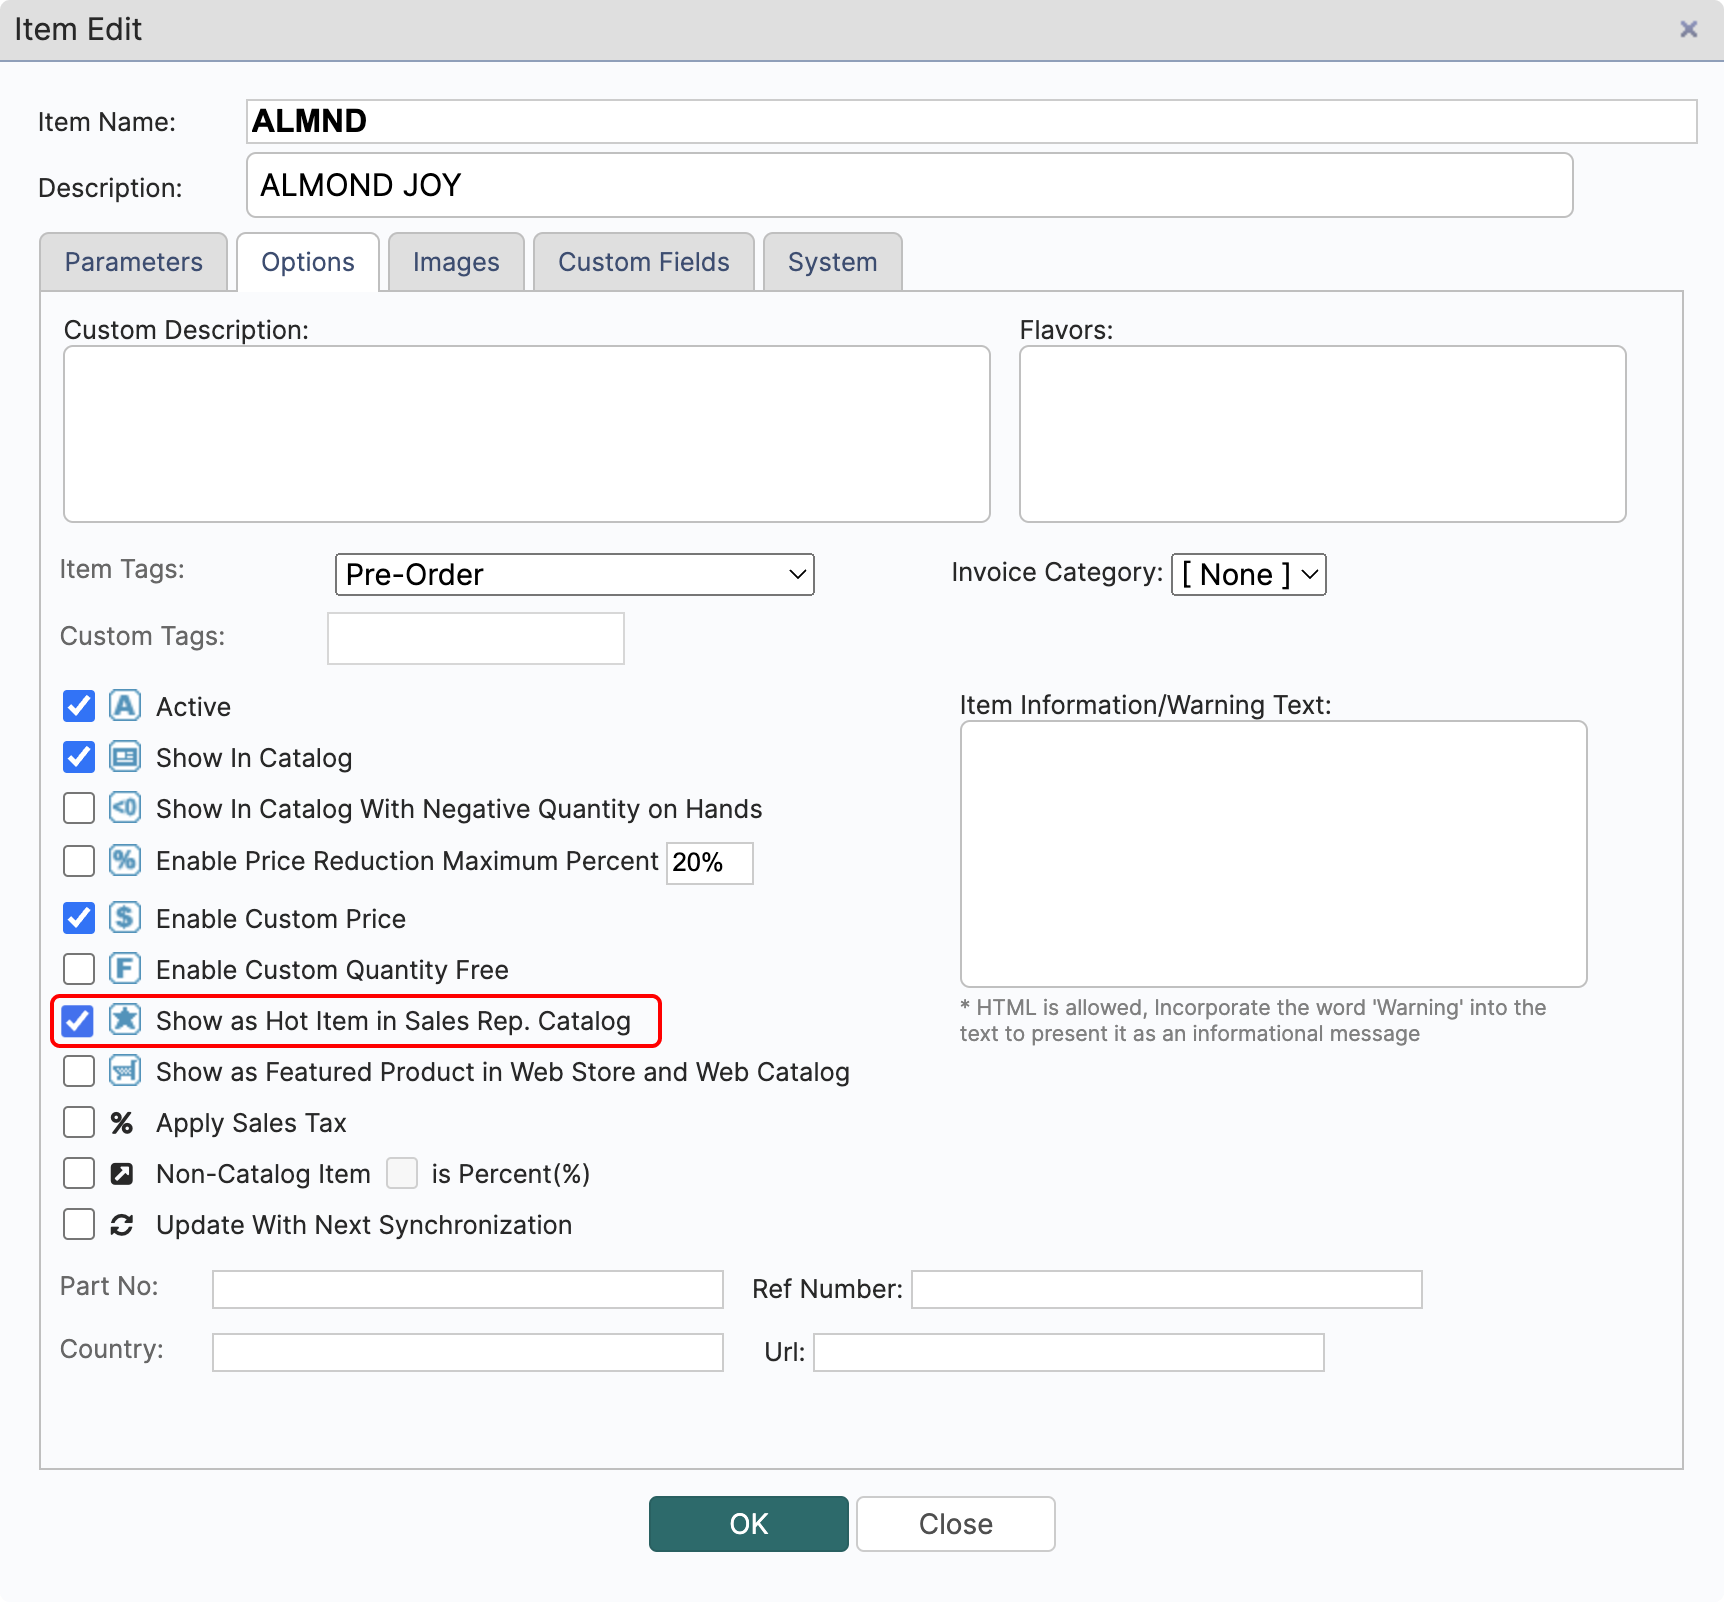
Hot Items page allows you to highlight items for sales representatives. Items marked as Hot Items will appear on this page in New Office Orders and Sales Rep Catalogs.
To designate an item as Hot Item, navigate to:
Item Management→Items→ Select one or more items→Edit/Edit Multiple Items→Options→Show as Hot Item in Sales Rep. Catalog
¶ 7 Categories/Brands
Quick way to navigate through your items. Clicking on one of these will return All Items within the category or brand
¶ Search
The search bar is fixed at the top of the screen in all sections. It allows you to search your items by: Item Name and Item Description.

When you are located inside one of the sections: the search will return items which match the search value and are located within the selected section.
e.g. If you are located inside the Customer Template section and search for an item that hasn't yet been added to the template, the search won't return any items. However, by clicking All Items, the search will be automatically re-done within the All Items section without having to retype the search value.
¶ How to Add Items to the Order?

Once you found the item that needs to be added to the order do the following:
¶ 1 Select the Unit and Price
- If you have multiple units for the selected item, a dropdown will appear if you click on the unit name (i.e. “Box”)
- If you have a custom price enabled, enter a new price or keep the original. Note, custom price should always be entered for the Base Unit. It will be automatically recalculated if you have or will select another unit.
¶ 2 Select the Quantity
- Write in the quantity manually by clicking on the number (i.e. “5”) or use the buttons -/+/+10 to adjust the quantity.
- Unlike in the case with Price, the quantity will is always displayed in the selected unit in 1.
i.e. 10 bags of Stacy's Bagel Chips come in 1 box and 1 case has 10 boxes. If you change the unit in step 1 from Boxes to Cases, 50 boxes of Stacy's Bagel Chips will be added to the order, which will equal to 5 Cases.
¶ 3 Select the Flavors
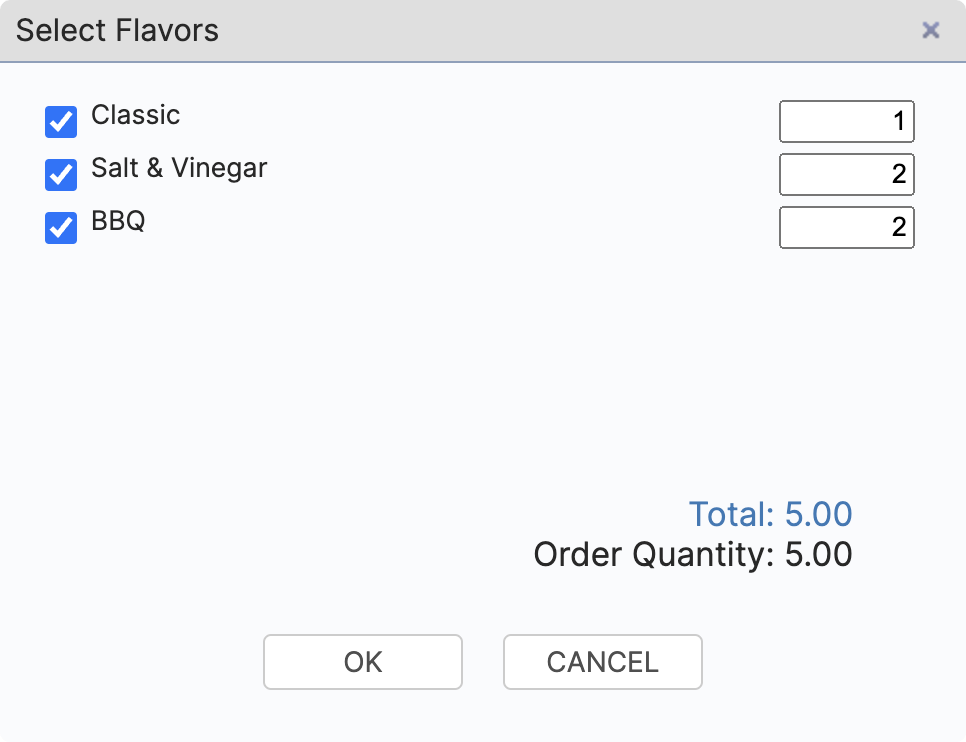
If the selected product has different flavors, you can choose the quantity of each flavor that needs to be added to the order.
¶ Order Review
Once you have added all the required items to the order, click Done in the top right corner of the page.
After that you will go back to the page, where you started the new order. You can modify the previously entered main order information.
Below the main order information, you will find an order summary. It has a few quick actions that allow you to quickly interact with the order:

¶ 1 Add Discount
You can add a discount or apply credit to this order. Enter a positive value to apply % discount to the entire order.
¶ 2 Add Non-Catalog Item
¶ 3 Delete
From the order summary select one of the following item/discount/non-catalog item by clicking on it (selected position is highlighted in green) → then click Delete to remove the selected position from the order.
¶ Save/Cancel the Order
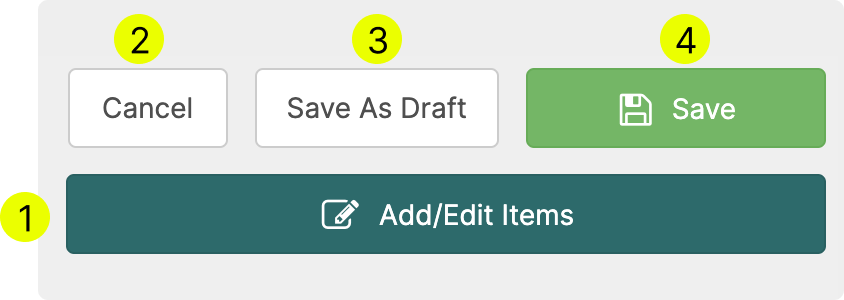
1 If you need to add/edit the items in the order
2 If you Cancel the order, you will not be able to go back to it
3 Save the Order as Draft if you are not done working with the order and would like to come back to it latter to make adjustments
4 Clicking Save will create the order. This order will have a "New" status.
¶ Unsaved Orders
If you accidentally close the window without saving the order, not all progress will be lost. LodDepot autosaves your new order progress and allows you to retrieve unsaved orders.
To retrieve an unsaved order navigate to the Sales Orders page and look for the broken link icon in the top right corner.
